All Crystal Stars
No AMW
|
| Last updated
|
???
|
| Version
|
NTSC-J
|
Tricks required
- Blooper Skip
- Blue Cage Event Overflow
- Cage Skip
- Ultra Hammer Early
- Bookcase Jump
- Yoshi Skip
- Bobbery Early
- Pirate's Grotto Early
- Gate Handle Early
- Enter Grotto from the back
- Flavio Skip w/ Super Jump
- Star Shot w/o Ultra Boots
- Teleporter Room Early
- Palace Skip
|
Major luck factors
- Mega Rush
- Star Shot item drop
- Palace Skip item drop
|
Prologue
| Lord Crump
|
| Mario
|
Jump x2
|
|
| Lord Crump
|
Superguard
|
|
| Mario
|
Jump x2
|
|
- Goombella joins your party
- Break the Contact Lens
| Toad Bros. Bazaar
|
|
|
Order the Contact Lens
|
| Buy
|
 4 Fright Masks
 4 Fire Flowers |
|
- Hit the Save Block (say no)
- Frankly's house
- Decline the action command tutorial
| Goomba Trio
|
| Mario
|
Fright Mask
|
up 1
|
- Get the
 Star Piece behind the yellow block
- Get the
 Black Key and Plane Curse
- Blooper Skip
Petal Meadows
- Bridge Skip (or hit the switch)
- Get the Fire Flower after the bridge
- Talk to Kroop and the gatekeeper
- Get the
 POW Block before the first fortress
| Bald Clefts
|
| Mario
|
POW Block
|
top
|
- Get the POW Block before the second fortress
| Bristles
|
| Mario
|
POW Block
|
top
|
- Fire Flower before the quiz
- Answer the quiz questions in the following order: 1, 3, 4, 2, 3
- Get
 Multibounce in the waterway and head right for the
 Sun Stone
| Fuzzies
|
| Mario
|
Fire Flower
|
top
|
- Head back left for the
 Moon Stone
| Fuzzies
|
| Mario
|
Fire Flower
|
top
|
| Gold Fuzzy
|
| Mario
|
Jump x2
|
|
| Goombella
|
Headbonk x2
|
|
|
|
Gold Fuzzy summons the Fuzzy Horde
|
| Fuzzy Horde
|
Guard
|
|
| Gold Fuzzy
|
Superguard
|
|
| Mario
|
Jump x2 on Gold Fuzzy
|
target Gold Fuzzy; right 1
|
| Goombella
|
Fire Flower
|
top
|
- Get the Star Piece from the bush on the way back to Petalburg
- Koops joins your party
Hooktail Castle
- Pick up
 Power Bounce from the block
- Don't read the letter
| Red Bones
|
| Mario
|
Fire Flower
|
top
|
| Koops
|
Fire Flower
|
top
|
| Level Up
|
FP → 10
|
|
- Do Flip Skip for the Star Piece and
 Castle Key
- Get the Black Key and Paper Curse
- Pick up
 Attack FX R
| Badge menu (unspinning from the bars)
|
| Equip
|
Attack FX R
Power Bounce
|
top
down 1
|
|
|
Check the email
|
- Backtrack for the Castle Key and head to the second floor
- Window Jump (or hit the switch)
- Grab the
 Life Shroom with Koops while riding the green block
- Castle Key after Ms. Mowz
- Run from the Dull Bones, get the last Castle Key, and head up to Hooktail
| Hooktail
|
| Mario
|
Power Bounce x9
|
x10 + x9 skips a shell toss
|
| Koops
|
Shell Toss
|
|
| Hooktail
|
Fire (Guard)
|
|
| Mario
|
Power Bounce x8
|
|
| Koops
|
Shell Toss
|
|
|
|
Pick the top option (Mario takes 5 HP damage)
|
| Mario
|
Power Bounce x8
|
x10 skips the shell toss
|
| Koops
|
Shell Toss
|
|
- Peach and Bowser intermissions
Pre-Chapter 2
- Pick up
 Mega Rush P from Kroop's yard
- Get the Star Piece from the tree before leaving Petal Meadows
- Go to the Thousand-Year Door
- Get the Star Piece behind Dazzle
| Dazzle
|
| Trade
|
 Item Hog |
|
Boggly Woods
- Watch the Shadow Sirens cutscene, and the cutscene at the Great Tree
- Hit the invisible block and get
 P-Down, D-Up P
- Talk to Flurrie at her house
- Get
 Quake Hammer from the block
| Shadow Sirens
|
| Mario
|
Jump x2 on Marilyn
|
|
| Koops
|
Power Shell
|
|
| Shadow Sirens
|
Superguard Vivian & Marilyn, Guard Beldam
|
|
| Mario
|
Earth Tremor (4 bars)
|
5 bars if you missed a superguard
|
| Koops
|
Power Shell
|
|
- Get the
 Necklace and return to Flurrie's
- Flurrie joins your party
- Go to the Great Tree
The Great Tree
| Great Tree alternatives
|
| (add info here about the no evt overflow route, as well as the cutscene overlap option.)
|
| X-Nauts
|
| Mario
|
Fright Mask
|
up 1
|
- Head up to the storage room
| X-Naut
|
| Mario
|
Power Bounce x4
|
|
- Get the
 Red Key, use Event Overflow to unlock the blue cage, then unlock the red cage
- Get the
 Power Punch from the bush
- Talk to the elder for the
 Puni Orb
- Leave the 11 Punies at the first pedestal and go back to the blue cage to retrieve the remaining 90
- Defeat the 10 Jabbies and leave (don't get the Blue Key)
- You can pick up
 Damage Dodge P for extra coins, but it's not necessary
- Defeat the 100 Jabbies (or Jabbi Hive Skip)
- Cage Skip, Water Switch Skip, trigger the escape sequence
- Leave the Punies in the basement
| X-Nauts
|
| Mario
|
Swap to Koops
|
|
| Koops
|
Fright Mask
|
up 1
|
- Get the Super Boots
- Pick up
 Charge and retrigger the escape
| X-Nauts
|
| Mario
|
Jump x2
|
|
| Koops
|
Fright Mask
|
up 1
|
| Level Up
|
BP → 6
|
|
- Get the
 Thunder Rage on the way up to Magnus
| Magnus von Grapple
|
|
|
Whenever you use a Spin Jump, make sure to hit both action commands
|
| Koops
|
Power Punch on Mario
|
down 1
|
| Mario
|
Spin Jump x2
|
|
| Magnus
|
Superguard
|
|
| Mario
|
Spin Jump x2
|
|
| Koops
|
Swap to Goombella
|
|
|
|
Magnus creates X-Fists
|
| Mario
|
Spin Jump x2 on Magnus
|
target Magnus; left 1
|
| Goombella
|
Swap to Flurrie
|
|
| Magnus
|
Guard to get Mario to 1 HP
|
X-Fists do 4 DMG, Magnus does 2 DMG
|
| Mario
|
Power Bounce x5 on Magnus
|
target Magnus; left 1. x6 if failed superguard
|
Pre-Chapter 3
- Go to the Thousand-Year Door
| Lovely Howz of Badges
|
| Sell
|
Damage Dodge P
Quake Hammer
P-Down, D-Up P
Attack FX R
|
down 1 (if you got it)
down 1
down 1
down 3
|
| Buy
|
 Power Rush |
|
| Ultra Hammer Early Super Jump
|
| (add info here about doing UHE with a Super Jump instead of FSS.)
|
- Ultra Hammer Early with a Flurrie Superslide
| Toad Bros. Bazaar
|
| Buy
|
 Contact Lens |
|
| Charlieton
|
| Buy
|
 Mega Rush
 Boo's Sheet |
required
optional
|
|
|
You can buy something cheap here to increase the odds of seeing Mega Rush or Boo's Sheet
|
| Westside Goods
|
| Buy
|
 Dried Shroom
 Dizzy Dial |
|
|
|
Get a  Mushroom from Shop Points |
|
|
Pick any option for the first question, third option for the next question
|
- Get Jump Storage from the Don Pianta cutscene
- Super Jump to the Twilight Town pipe and get rejected
- Talk to Francesca at the harbor
- If Mario isn't at 1 HP, fall in the water
- Check Charlieton for Mega Rush and/or Boo's Sheet if necessary
| Westside Goods
|
| Store
|
Dizzy Dial
Mushroom
Dried Shroom
Any extra Charlieton items
|
|
- Get the
 Blimp Ticket
- You must have Mega Rush from Charieton before going to Glitzville
| Badge menu (in the background before the blimp)
|
| Equip
|
Mega Rush
Power Rush
Mega Rush P
|
top
down 1
down 3
|
|
|
Swap to Goombella
|
- Take the blimp to Glitzville
Glitzville
| Souvenir Shop
|
| Buy
|
1 Power Punch
 3 Point Swaps |
4 if you didn't get a Boo's Sheet
|
- Watch the cutscene in the lobby
- Talk to Grubba and pick the bottom option
- Bookcase Jump
- Check the desk drawer and go to the arena
- Mario should be at 1 HP, make sure Goombella is out
| Macho Grubba
|
| Mario
|
Jump x2
|
|
| Goombella
|
Point Swap on Goombella
|
top
|
|
|
Macho Grubba powers up
|
| Mario
|
Power Bounce x4
|
|
| Goombella
|
Headbonk x2
|
|
- Peach and Bowser intermissions
Pre-Chapter 4
| Inventory (after Glitzville)
|
| Point Swap
|
Point Swap
|
| Power Punch
|
Boo's Sheet
|
| Thunder Rage
|
Life Shroom
|
| Fire Flower
|
| You may have another Point Swap instead of the Boo's Sheet.
|
- Swap to Flurrie in the background after the blimp (or Koops if you didn't get rejected by the pipe)
- If you didn't get rejected, do Teleporter Room Early with an Unspin Clip and use the door for Jump Storage (or Double Jump to the pipe)
- Go to the Thousand-Year Door
- Get Jump Storage from the email after talking to Frankly
- Talk to Darkly
- You can check Charlieton for the Boo's Sheet if you want
- Super Jump to Twilight Town (teleporter Jump Storage or Double Jump if you missed the email Jump Storage)
Twilight Town & Creepy Steeple
Twilight Town
- Talk to the gatekeeper, the shopkeeper, then visit the Mayor
- Get Jump Storage from the gatekeeper cutscene
- Get the Black Key (and the
 Shop Key if you missed Jump Storage)
- Shop Key Skip (or unlock the door)
- Pick up the Life Shroom, Boo's Sheet, and Tube Curse
Creepy Steeple
- Head to Creepy Steeple and free the Boos in the basement
- Talk to the Boo and pick the bottom option
- Get the
 Steeple Key and head up towards Doopliss
- Swap to Goombella before starting the Doopliss battle
| Doopliss 1
|
| Mario
|
Power Bounce x7
|
|
|
|
Doopliss transforms
|
| Goombella
|
Headbonk x2
|
|
- Go back to Twilight Town, Vivian joins your party
- Go back to the Steeple and fall down the well (if Mario isn't at 1 HP, use the Buzzy Beetles to take damage)
- Get the
 Steeple Key, the
 ン Character, and
 Power Plus
- Go back to Twilight Trail and spell Doopliss' name: ランペル
- up, left, up x2, A
- down x2, right, down, A
- left, down, left, A
- up x2, left, up x2, A
- right x2, down x2, right x3, down, A
- Return to Creepy Steeple and fight Doopliss again
| Doopliss 2
|
| Mario
|
Power Bounce x7
|
|
| Level Up
|
BP → 9
|
|
- Peach and Bowser intermissions
Keelhaul Key & Pirate's Grotto
| Inventory (after Creepy Steeple)
|
| Boo's Sheet
|
Life Shroom
|
| Point Swap
|
Point Swap
|
| Power Punch
|
Boo's Sheet
|
| Thunder Rage
|
Life Shroom
|
| Fire Flower
|
| You might also have three Point Swaps and one Boo's Sheet.
|
Keelhaul Key
| Badge menu (leaving Twilight Town)
|
| Equip
|
Multibounce
|
up 1
|
| Unequip
|
Power Bounce
Mega Rush P
|
up 1
up 1
|
| Equip
|
Power Plus
|
L
|
|
|
Swap to Yoshi
|
- Take the pipe to Fahr Outpost and get
 Double Dip P from the hidden block
- Use the blue pipe to get to Keelhaul Key
- Get the Thunder Rage at the top of the cliff
- Bobbery Early
| Embers
|
| Mario
|
Thunder Rage
|
up 3 (up 2 if lost a Life Shroom)
|
| Yoshi
|
Thunder Rage
|
top
|
- Knock down Bobbery
- Pick up
 2 Coconuts from the tree in the background
- Get the
 Chuckola Cola from Flavio
- Grab the
 Inn Coupon on the way back to Bobbery to fill your inventory
- Bobbery joins your party
- Pirate's Grotto Early (traditional method or Super Jump)
Pirate's Grotto
 Gate Handle Early
- Place the Gate Handle
- Don't hit the blue switch
- Get the
 Grotto Key from the storage room
- Unlock the door, enter the room with the spike wall, and backtrack to the start of the Grotto
| Bullet Bills
|
|
|
Try to get Mario down to 2 HP
|
| Bullet Bill
|
First strike (don't guard)
|
|
| Mario
|
Swap partners
|
|
| Partner
|
Swap to Yoshi
|
|
| Bullet Bill
|
Don't guard
|
|
- Backtrack to the bay at Keelhaul
- Get Jump Storage with the floor panel Star Piece (or a Whacka Bump if you miss)
- Super Jump into the back entrance to Pirate's Grotto
- Free the Toads
- If Mario isn't at 1 HP, fall in the water until he is
| Cortez
|
| Mario
|
Spin Jump x2
|
|
| Mario
|
Spin Jump x2
|
|
| Mario
|
Spin Jump x2 on Cortez
|
target Cortez; left 2
|
- Get Jump Storage from a
 Whacka Bump (toss the Inn Coupon)
- Super Jump Flavio Skip
| Badge menu (during Flavio Skip)
|
| Unequip
|
Power Plus
|
down 1
|
| Equip
|
Item Hog
|
down 4
|
- Take the blue pipes to Poshley Heights
Poshley Sanctum
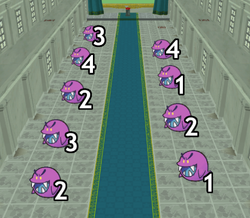 Dark Boo battle formations
- Get Jump Storage from the Inn Coupon behind the pasta stand (toss it)
- Super Jump up to the blue switch in Poshley Sanctum
- Swap to Goombella in the background
- Farm an item to get Text Storage and Jump Storage for Star Shot (see the flow chart below)
